Tuesday 5 November 2024

Vintage Christmas card


Good Morning Ladies, 

I hope that today finds you all well, gentle hugs to those of you that need one 😘🥰

I had a lovely crafty day yesterday,  I was just sat trying new techniques, playing with inks and die cuts for most of the day, the whole thing made so much more enjoyable by the lovely company I had.  (Paul) in case you hadn't guessed 🤣😂

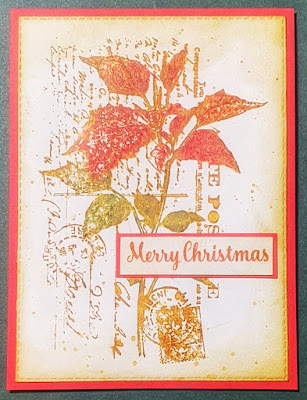
I started todays card on Friday, I bought a vintage Christmas scenes card, it was very inexpensive but I thought it wouldn't make some cute Christmas cards.                                                                                   I used my 'sizzix Snail Mail' die to cut a piece of one of the Vintage Christmas scenes, at first I thought that the die would obscure to much of the scene but I think it looks ok.  I took a piece of mixed media card and added a light coat of Walnut Stain ink to match the colours on the Vintage paper.  I adhered the die cut piece to the mixed media paper and then layered onto a piece of mirror card then onto a cream card base, edged with Vintage photo ink.  To finish the card I used a sentiment from Tim Holtz Christmas sticker book and layered it onto a piece of mirror card and added it to the top right if the card.  

I hope that you all have a lovely weekend, 

Love and hugs to all of you,

Sandra xxx

Monday 4 November 2024

My First Layered Stencil Card


Good Monday Morning my lovelies,  

Here we are at start of a brand new week at the start of a new month!   What have you all got planned?  I have GP phone consultation tomorrow and bladder clinic Thursday,  it will be a fun outing as both girls have the day off.  This one will be the decider as to whether I carry on with the treatment or not, as it stands I lose one weekend a month to severe uti symptoms,  however before I started it was a lot more than once a month, I need to discuss it with the consultant I think. 

Today I am sharing my first go at using multi layer stencils,  this one is a Sizzix stencil called 'Flowers', I used Distress Inks to colour the stencils, thankfully they blended beautifully on this occasion!  I really enjoyed using the stencils to create with,  I will confess that I did buy the stamping/stencil tool that Sizzix designed for these stencils and it made the whole process so much easier, no faffing about trying to keep the layers lined up perfectly.   Of course I wanted my first venture into layered stencilling to go to someone that inspired me to have a go at this technique,  Karen's Birthday was perfect timing!   It was the gorgeous Birthday cards that both Maria and Karen made for me that had me really inspired to try stencilling.  So thank you ladies XXX

I hope that you all have a great start to the week, 

Love and hugs to all of you,

Sandra xxx 

Sunday 3 November 2024

Our Challenge makes


Good Sunday Morning Ladies,

From a very gloomy Gloucestershire, I think the sun has gone on holiday!  We had to have lights on from lunchtime yesterday. 

Now, talking of holidays I overheard this very 'trendy' looking woman in Tesco yesterday (Paul had abandoned down the bread aisle while he was looking at Bagels)  Her friend asked her if she managed to get a 'holiday' booked,  her reply  ....       Yes we have booked our "Recalibration Break' for a week at the end of the month.                                        What on earth is a 'Recalibration Break'!!!                Obviously a "holiday ''  but is it 'Woke", 'Trendy', Hippy or just downright ridiculous, I'm proper confused,  which probably means that I definitely need a 'Recalibration Break'  🙄😂🤣

Let's have a look at you have been making: 

Karen


Karen's Description:

Card 1 :  Here’s a “something old something new…” card

I have never used this Tattered Lace USB “Special Shaped cards” So cut HAPPY BIRTHDAY and To You to fit a DL envelope and the butterflies are from an old John Lockwood die set xx

Card 2:  A challenge card
Something old - Sue W Let it Snow 
Something new - Aall&Create background dies
Something blue - my favourite patterned paper pads

Two amazing cards Karen, I know you said that first card is one of the simplest you have ever made but it's fantastic,  a real mantelpiece pleaser!  So versatile too! 

Now I have to say that that Aall&Create border just seems to work with the snowy theme,  maybe its the abstract design,  it just works, that paper is perfect for the theme too.  

Thank you so much for 2 amazing cards for this challenge XXX 

Lilian 


Lilian'sDescription:

here is my tag for this week, sorry it’s a bit like yours, I’ve been playing all week trying to get it the way I wanted.

Categories : something new : moon mask

                       Something old : ink and stamps ( night of navy )

                        Something blue: ink

                        Something borrowed: idea from Alison at words and pictures.

No apology necessary,  it's quite different to mine, I think you have been way more creative!                     I really appreciate the time you put into creating your lovely tag, the detail of the moon is amazing XXX 


Maria


Maria's Description:

Something new is the background die, something old is the die where the sentiment is stamped on ( think it's spellbinder 46). Jumped over borrowed and went straight to blue which is this shiny Blue card.

I am absolutely loving Plaid backgrounds at the moment,  so your card is ticking all of my boxes!  I love your design, that blue is gorgeous,  I really like that little book style tag for your sentiment too!        Thank you so much Maria for a lovely card XXX 

*******************

I hope that you all have an enjoyable Sunday, 


Love and hugs to all of you, 

Sandra xxx

Saturday 2 November 2024

Mixed Up Saturday


Good Saturday Morning Ladies, 

I hope that you are relaxed and ready to enjoy the weekend.  No plans here,  have any of you got anything exciting going on.  I am expecting to hear fireworks all weekend, probably all next as well, whatever happened to it just being about Guy Fawkes on November 5th?!! 

Today I am going to share some of the backgrounds that I have been making this week with you. 


This first one was hard to photograph,  it was made using Old Paper & Fossilised Amber Distress with a spritz of water and then dried and then I added Vintage Photo & Iced Spruce Oxide Spray


Now this one shows up looking purple but it isn't at all, I used Festive Berries, Fired Brick & Aged Mahogany Distress and then spritzed with water and dried, I then added Fired Brick & Peeled paint Oxides. I did add a bit of Distress Spritz on this one for added sparkle. 


This one I used Forest Moss & Bundled Sage Distress and Pumice Stone & Mowed Lawn Oxides spritzed with water  


Finally my favourite......


Now this one was a total experiment, I used Peeled Paint and Iced Spruce Distress spray for the background but then my creative brain went into overdrive, I wanted something sparkly, something more than a hint of sparkle, so what can I use, I fumbled around in my 'spray cupboard' and pulled out my Distress Resist spray, I knew it resists  anything I put over it, I decided to add some Gold Embossing powder, just to see what happened,  I set the piece to one side to dry completely, Once dry I got my heat tool and to see if the embossing powder would still melt,  to my delight it did,  however the effect was even better because the Resist Spray had 'resisted ' the embossing powder by pushing it to the outside perimeter of the dots of resist spray, highlighting the colour underneath,  the melted embossing powder highlighted the little spots of distress.

To me it looks like you are looking down at earth from space!!!  I know,  I know, I need to get out more, I am getting way too excited about a bit of inking and embossing 🤣😂😳

You know what they say about 'little things pleasing little minds '  🤣😂

I now have to decide what to create with then now!  

I hope that I have inspired you to have a go at inky backgrounds.

Have a lovely weekend my dear friends, 

Love & Hugs to all of you,

Sandra xxx  


Friday 1 November 2024

Crackled Christmas Tag


Goodbye October,  Welcome November 

Good Friday Morning Ladies,   

Let's hope November is a bit drier than October, I can hardly believe its November, lets hope for some cool, crisp, dry days ahead x 

Is it really a week since I had that scan?  The time has absolutely flown, I have been trying to keep my mind busy, I feel exhausted if I'm honest,  I have been struggling to sleep and when I do eventually get to sleep I wake in absolute state of panic, it takes a good hour or so for me to calm down enough to try and get back to sleep, its usually around 5am by this time!   I have GP consultation on Tuesday so I am going to discuss this with her then, I am also going to ask for a Cardiology Referral, I haven't seen a consultant Cardiologist for around 10 years as we moved just after I was diagnosed.  

I had another messy craft session yesterday,  I really do enjoy creating inky backgrounds, I think its partially because you just never know how anything is going to turn out,  there are highs and lows,  I made a background that I loved yesterday and then decided to add some Mica spray to give it some 'glitz' and it was too dark and ruined the whole piece,  lesson learned,  I now spritz onto a piece of scrap first,  my biggest tip is use a large cardboard box for all your spritzing, that way the 'mess' us all contained in one place that you can put to oneside to re-use! 

For this particular tag I used Tumbled Glass, Faded Jeans & Salty Ocean, I added them to my ink mat one by one and spritzed with water and dipped my watercolour card in the ink, drying between each dip.  To bring it all together I used Tumbled Glass to blend over the inky  background.  I did use a Distress Mica spray on this piece, which added some sparkle. After it had dried I used a Tim Holtz mask, I used some Crackle Paste through the mask and left it to dry, once it had dried I was pleased with the crackle, I wanted it a little whiter though, so I replaced the mark and added white ink over the crackle paste.                                                              To finish the tag I took some narrow seam binding and coloured it with the same inks, spritzed with water and then dried with heat tool.   The tag I stamped with a Tim Holtz sentiment in similar ink, I used a circle die to cut it and added a hole for an  eyelet,  I added an eyelet and threaded the ribbon through the both tags.  

I have zoomed in so that you can see the crackle and hopefully the shimmer!  

I hope that you all have a good end to your week,

Love & hugs to all of you,

Sandra xxx