Tuesday 31 January 2023

Love this embossing effect


 Good Morning Ladies, 

Just  a quick post today as I have been asleep most of the afternoon,  I managed to get GP appointment yesterday after becoming quite poorly on Sunday evening,  turns out this never ending Uti has moved up to my Kidney, the pain is off the chart!  So more weeks on Antibiotics,  11th course!!  I am just done with this now! 

Today's card is one I made on Friday,  I was experimenting really, I embossed a piece of Night of navy card with the Country Floral embossing folder (I spritzed with water for extra depth) .  I then took a White ink pad, and the back of a piece of Cut & Dry foam,  the back is a firmer surface which makes it easier for ink to glide over the surface rather than getting onto the background of the card as well, I use the same thing for Gilding wax.  After it was dry I trimmed it to fit behind my new Fabulous Frame Die, added some narrow blue ribbon with a label die, the final touch was a few white gems. 

I hope that you all have an amazing day,

Love and huge to all of you,

Sandra xxxxxx 


Monday 30 January 2023

Sue's Embossing Challenge card


Good Monday Morning Ladies,

I hope that you are all starting the week well, if like me that is not the case then gentle hugs are winging their way to you.  

I am happy to report that I had a full nights sleep Saturday night into Sunday morning, I was in bed by 10 and asleep by half past, I was up twice going to loo but was straight back to sleep! Hallelujah  Fingers crossed it wasn't a one off! 

Today's gorgeous card is one Sue made and sent to help me out.                                                                       Sue's Description:

Hi Sandra. A simple embossed card for the challenge. I used a Lisa Horton DL embossing folder - a freebie from Simply cards and papercraft. After embossing pink card I gently went over the whole piece of card with Rose Bud Memento ink pad. I added a dynamo sentiment, layered it onto a light pink then a white card base. Super quick and easy.

Oh Sue your card is so beautiful,  the amount of detail is incredible, I love the colour you have picked too.  

Thank you so much for sharing this gorgeous card with us my lovely XXX 

Ladies I hope you all have a great Monday,

Love and hugs to all of you,

Sandra                                                                              xxxxxx 

Sunday 29 January 2023

Your Shades of colour Challenge


Good Sunday Morning Ladies, 

I hope today finds you well and you have a mice relaxed Sunday planned.

We have nothing planned in case I have another night like I did Friday night, I watched every minute pass, usually after such a long night I am ok but yesterday was different,  I struggled to keep my sore eyes open most of the day.  The other frustration was itching,  everywhere, all night, I am guessing it's a side effect, I do recall itching with one of the antibiotics I was prescribed in November.  I will check with GP when she calls me tomorrow.

Did you all enjoy seeing everyone's craft storage?  I loved having a look at  how you stored your craft bits and pieces.  I may use some of your ideas, so thanks again for taking the photos,  anyone that  missed sharing theirs can send photos in and I will share next Saturday.

Now lets get to the best part about Sundays,  your amazing Challenge cards, this week we carried on the 'Shades of'/ink blended ' backgrounds Challenge, lets have a look .....

Your Challenge Cards 

Janet


Janet's Description:  

This is another SUE WILSON  card using Efolder which could also be used for this coming CC. The ribbon and sentiment are from my never ending stash.

Janet I absolutely love your card, every element is gorgeous,  the embossing folder you have used works so well,  the ribbon is a fantastic addition,  that oval die cut is so pretty, the perfect base for your lovely sentiment die cut.  The final finishing touch is those perfectly placed pearls.
Thank you so much Janet for a very inspirational card XXX 

Karen


Karen's Description:

Here’s my offering for this week’s challenge 
It’s another Thrinchie I am thoroughly enjoying doing these It’s like doing an art journal and seeing what works and what doesn’t
Here’s my offering for this week’s challenge 

For instance the blending of some colours worked better than others - don’t like the purple 
Anyway a blend of Villainous Potion, Blueprint Sketch, Lucky Clover, Squeezed Lemonade, Spiced Marmalade and Fired Brick DO over an Aall and Create die cut 
Stamped border #490 and pencil #165 coloured with ancient Caran D’ache pencils - what a bargain they turned out to be Charlotte had these for school about 20-25 years ago

Karen this Thrinchie is so incredibly bright and vibrant, the colours are stunning,  your blending is amazing too, you must have been so pleased with those pencils, I love that funky stamped border, it works perfectly.  You have inspired me soooo much to have a go at these.  Thank you so much for taking part XXX

Lilian 


Lilian's Description:

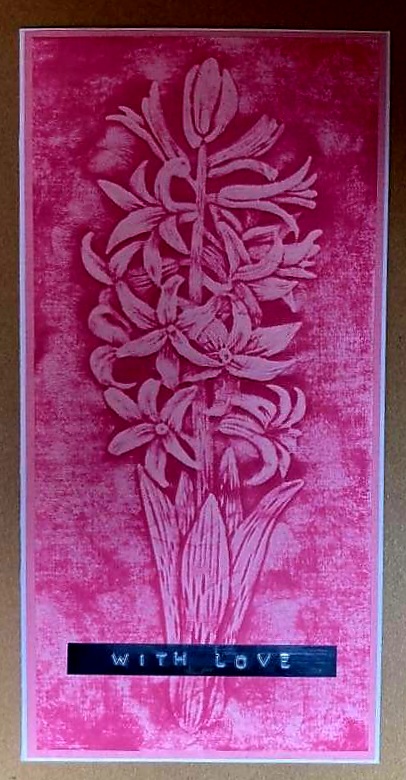
Hi, here is my card for this week. I used my new spell binders die. Embroidery threads, sorry ran out of greens. It takes a lot of thread and quite a bit of time. Lilian

Oh Lilian,  you have made my fingers itch to get creative with that die we both bought, I love the colours you have used, they work brilliantly with that background green! Now this card would work for any occasion, you can make it look totally different with a change of colours.   I think it would look great if you used white threadbon blue background,  so the little circles look like snowflakes.  Thank you so much for an amazing card my lovely XXX 

Maria 


Maria's Description: 

1/ Green- Glitter paper, D inks and a die cut butterfly
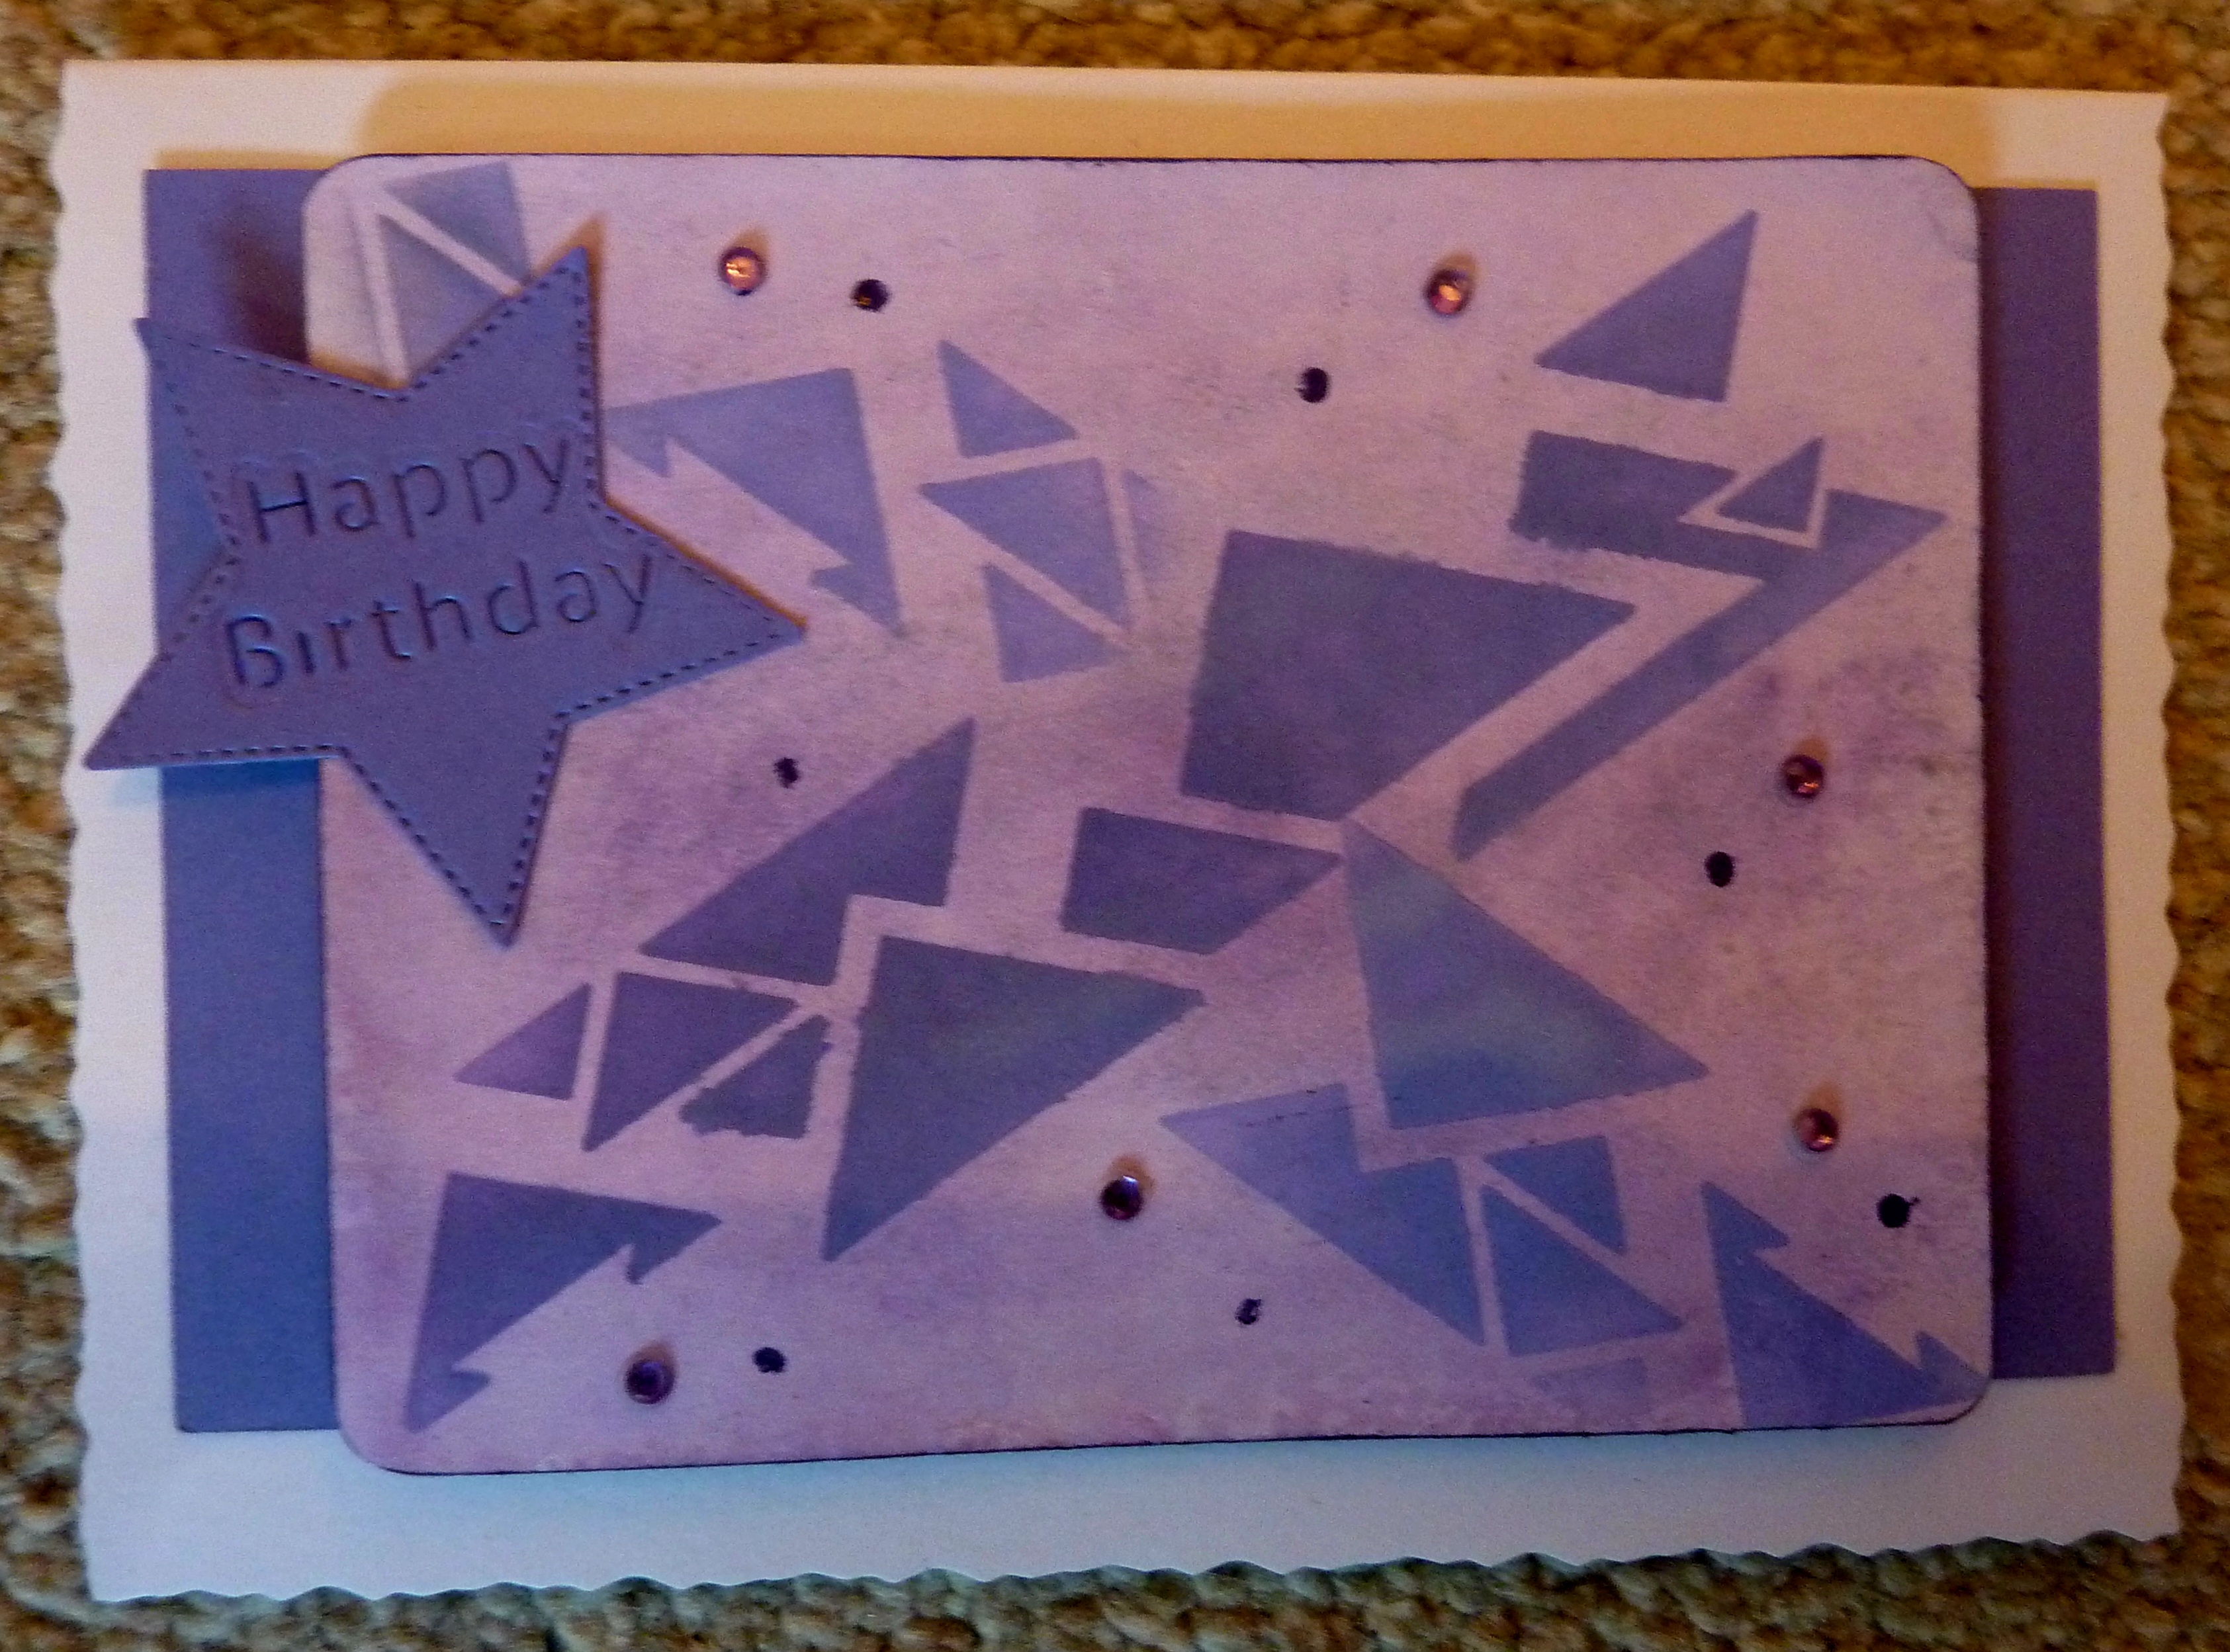
2/ Purple- D inks on glass and spritzed some water, dipped the card in the inks,
let it dry and used a stencil to make the pattern and a die cut star with Happy 
Birthday 
3/ Blue- D inks/oxide mix.Heat embossed through a stencil and die cut
Hugs and heat embossed with clear powder twice. 
I get it everywhere when I do embossing and using glitter so probably
 will do dry embossing for next week Emoji :) 
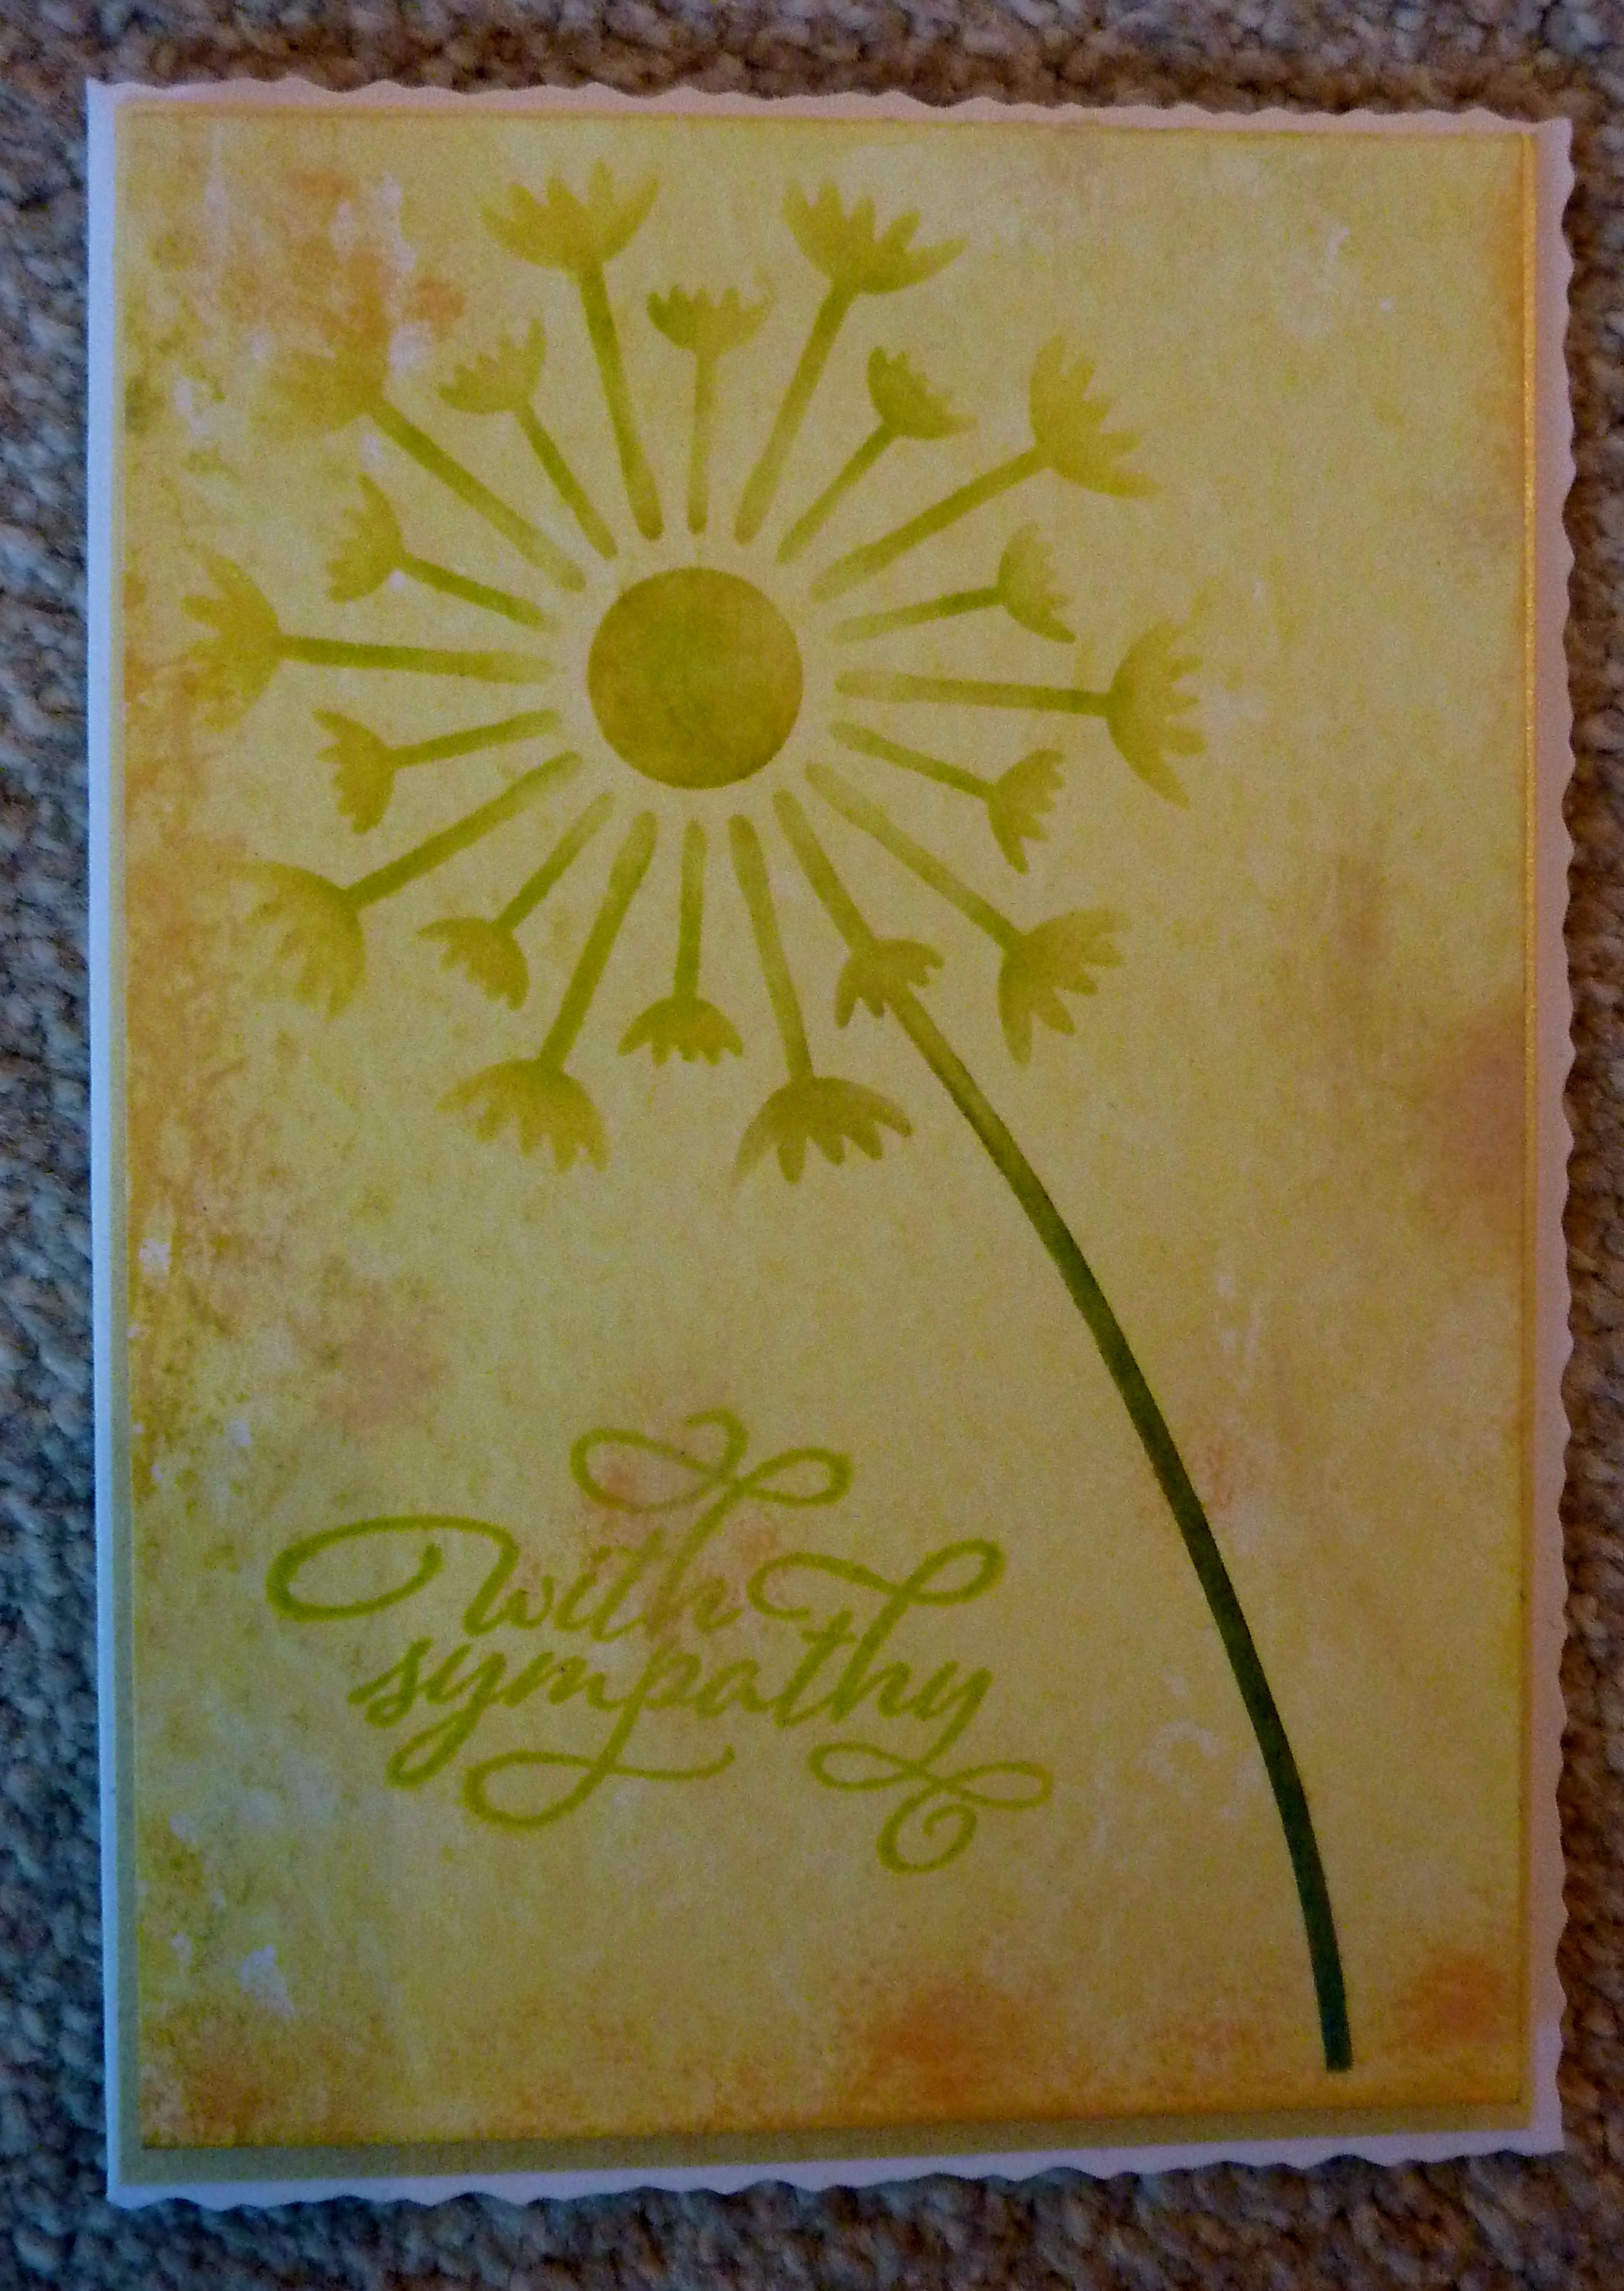
4/ Yellow- once again D inks, used yellow and some orange and little 
green-ish to the stalk. Stencil for the flower and stamped the sentiment.

Wow Maria, you have made some amazing cards for this weeks challenge, the first card is gorgeous,  (obvz my favourite colour, teehee)!  The other three inked backgrounds are amazing, love the pattern on the purple card, the shimmer on the blue card is do pretty, the yellow is a lovely Sympathy card.  Thank you so much my lovely XXX 

Sonia


Sonia's Description:

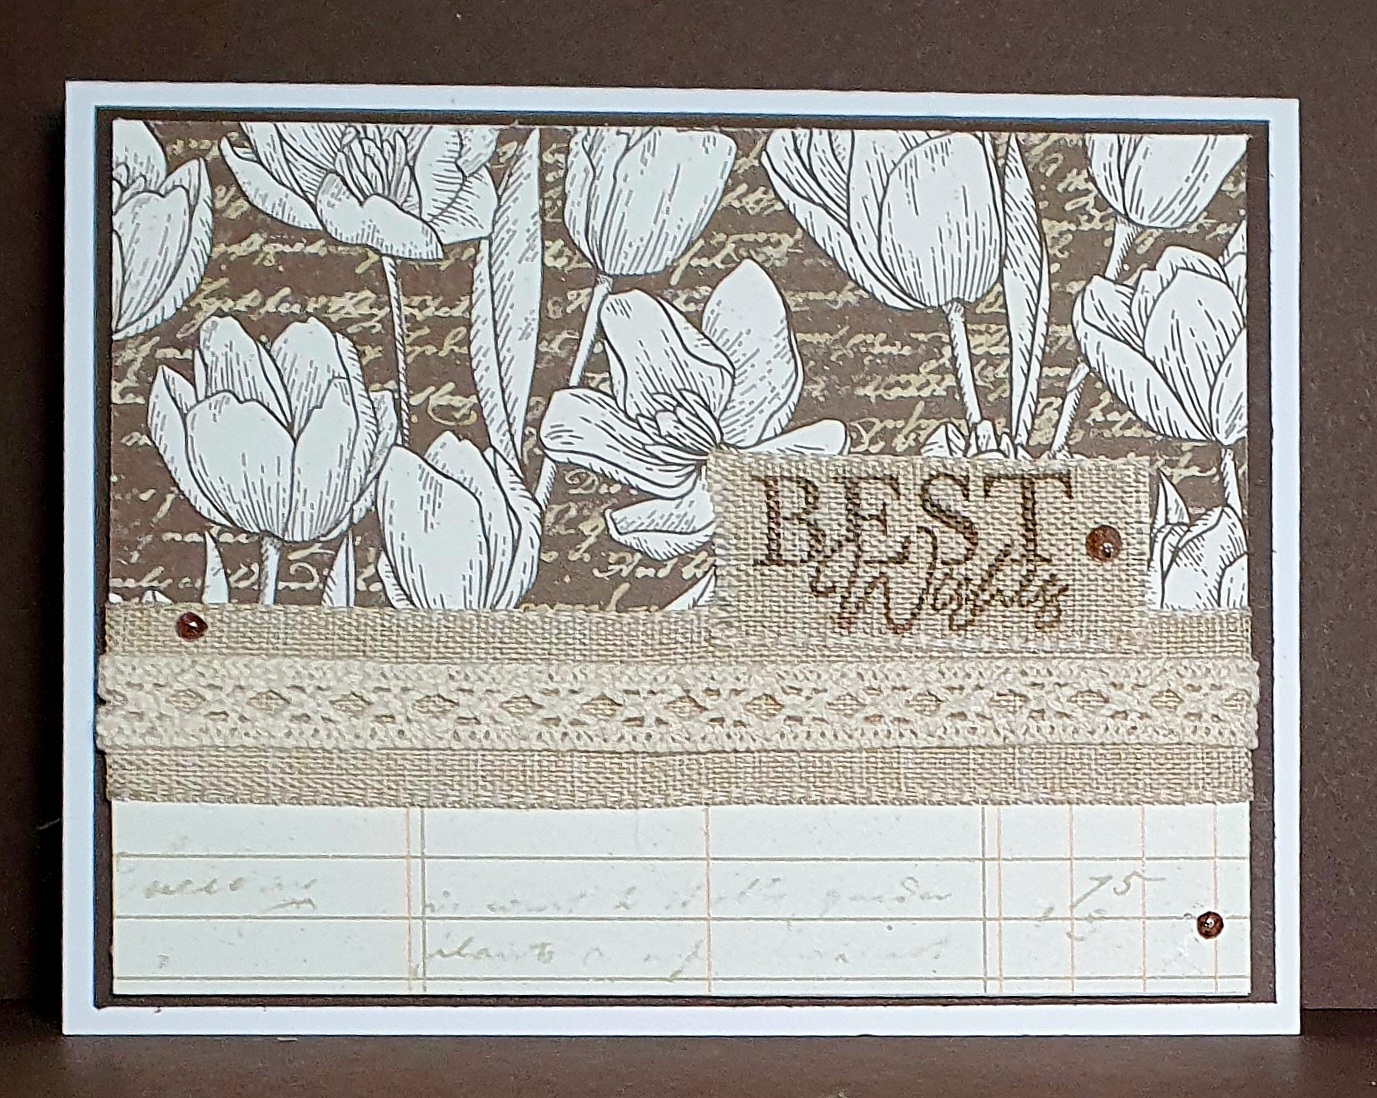
I used crackle paste through a Tim Holtz stencil, then used my Lindy’s Gang sprays to colour. I quite like the combination of the green and coral 😍 I originally only put on the hot foiled ‘Thank you’ - which was done on vellum, but then noticed a chunk missed from the texture paste, so hot foiled a Tim Holtz butterfly die and put that on to cover it up ☺️

Oh Sonia, I don't know where to start, firstly the texture that you have acheived on your green/orange background pieces looks like expensive fabric, such a clever technique!  The foiled sentiment on vellum is so delicate,  it stands out but is delicate enough not to take away from the background,  what a fan idea to Foil your signature butterfly!  Thank you so much my lovely for a beautiful card. XXX

Sue

Sue's Description:

Yes, a butterfly or three. Yes, of course one covers a smudged sentiment! 😏xx

Such a lovely card Sue, I love that Dandelion embossing folder!  Love the colour you have used, the Butterflies look perfect anywhere!  They are designed to cover oopsies!!  Thank you so much for taking part my lovely XXX 


*****************************

An amazing display today Ladies,  you are all so incredibly creative, every card is completely different.  Huge, heartfelt thanks to all of you ❤️ 

I hope that you all have a lovely Sunday,

Love & hugs to all,

Sandra
xxxxxx

Saturday 28 January 2023

Mixed up Saturday


Good Saturday Morning Ladies, 

Welcome to a very busy Post,  Sue has written an amazing magazine review that highlights some fantastic techniques and tutorials.  Then we have everyone's craft storage, its lovely having a nosey around each others storage ideas, apologies in advance, mine is messy! 

We are starting today's post with Maria's amazing Crystal Art Painting, such a beautiful scene, does it say where it is Maria?  I love how the light is shown by the different colour beads, it's so clever.  I am determined to have a go at one.   Thank you so much for sharing it Maria, I can understand why you enjoy them so much XXX

Right ladies I will let you go and enjoy the rest of the post, you made need a cuppa and a biscuit! ...


Simply Cards and papercraft 

Issue 239 Review


This month there are two freebie sets. The 1st is a Pinkfresh Butterfly stamp & die. The 2nd is a set of 21 Butterfly Florals stamps. These stamps range from beautiful flowers to sketchy lines, small random splats to a text background and several sentiments. A great range that will cover many styles of cards. There are also the usual digital papers and toppers for you to print off to extend the freebies. 


In this article there are 7 card ideas which cover several different techniques and I love everyone of them. The How To here is to get more from your stamps and die which leads to a very pretty and fresh finished card, ideal for Spring time birthdays. 


The Tried & tested item this month is the Sizzix stencil & and stamp tool. These type of tools are very popular at the moment and this is a two in one tool so a space saver which is always good for our bulging craft spaces. 

The idea of the tool is to hold stencils and stamps still and to enable you to put them back into the same spot for re stencilling or re stamping and also to allow layered stencils and stamps to be lined up perfectly. This tool has a sticky grid sheet which fits into the bottom of the tool so that it holds your card in place so no need for low tack or washi tape. The sticky does wear off over time so you will need to buy replacements sheets which come in packs of 5 from Sizzix. 

There is a stencil adaptor which clips onto the base of the tool in various places allowing for layered stencils to be clipped onto it which can be lined up perfectly every time. The clear gridded stamp plate clips onto the base and allows you to layer stamps and re stamp agin and again in just the right spot. That makes for easy batch card making. There are 5 cards made with some layered stencils and stamps. I absolutely love the Green background Thank you flowers card. That background would be just about impossible for me to copy freehand so I definitely do see the advantage of using a stencil tool to make these types of backgrounds. If you are not particularly confident at freehand painting etc then one of these tools may be just what you need. 


Here there are some more pretty cards made using the freebies. Some different styles and techniques used with lovely pastel colours but they can all look so different if using different colours. I particularly love the first card. Isn’t it beautiful. I will definitely be making that one.
 

Double embossing is explained here. What a coincidence as it’s fits in with the challenge this week. This card uses both dry and heat embossing here. Dry embossing uses plastic folders which are run through your die cutting machine. Heat embossing with slow drying ink and embossing powder which melts when it is heated with a heat tool is done over the dry embossing to leave a lovely texture and depth. I need to try this technique as I have only done one or the other up until now. 


This technique shows some fun shaker backgrounds on various cards. They are a great way to make your card stand out. I like how you can vary the size of the windows where you can see the shaker items, which don’t have to be sequins. As long as they are small enough to move around freely in the size of the pocket almost anything can be used. I love the difference between the floral Special birthday card that uses not so many clear sequins and the Happy Birthday card that has lovely big windows that show off lots of coloured sequins. There are two How To: instructions, one for getting started on shaker backgrounds and one for intricate shaker backgrounds so something for every level. I do need to find my pot of multi coloured sequins now! 


The final article using the freebies is thinking outside the box to make things other than cards. There is an origami box with full How to: create an origami box with lid instructions, a bunch of flowers, a very pretty tag and 3 different gift bags/boxes. I think they would be lovely for children to make, with some help maybe as gifts for grownups.


This product focus did catch my eye as I haven’t heard of it before. It is from IndigoBlu and is called Fast cast resin. You use acrylic paints and pigment powders to colour the resin embellishments. It looks like you can have great fun making all sorts of objects using silicone moulds. I wonder if it is similar to using the melting pots that have been around for a while now?


Here are some lovely bright and cheerful cards decorated using freezer paper. This has a shiny side, which has the wax on it and is the side that, once die cut, needs to be stuck to the card stock by ironing it with a dry iron until all of the wax has melted otherwise paint will seep under the waxed paper. When you have used all of the waxed paper images that you want to use on the piece of card you can try using various watercolour techniques. Once completely dry use a pokey tool to lift a corner of the waxed paper mask and gently peel off. A fun technique where you can make several background pieces ready to use another time.
There are also all of the usual crafting news, letters, competitions etc. to enjoy.

As always please ask if you want any more details. Take care Sue xx

***************************

Sue,  what an amazing,  in depth Magazine Review, I did look for it in Morissons but they didn't have any craft mags.  There is so much in this issue, love the free gift too.  
Thank you so much my lovely,  I really appreciate you taking the time to write such an amazing review XXX


Craft Storage 

Karen


Maria


First I have sent you three photos of my storage, Old Mugs for pens etc.
Baskets for my cards, Magazine boxes and MDF shelving for coloured
cards and papers. I'm sure we all got some of these die and stamp storage.
I like them but need to get another system for what is in them.


Sonia


Some of my stamps are in two big A4 ring binders, separated by the clear pocket pages. I have loads more stamps but at the moment they’re in clear boxes!
My ink blending brushes are stuffed into this wooden holder - any ideas for a better way to store them would be much appreciated! ☺️ My ink pads in the clear 12x12” boxes.


Sue


Here are some of m craft storage.

A4 paper storage. Got it from Mum and Pops office when they retired.

This carrier has a divider down the length and I use four cut down rectangular yoghurt pots to separate different tools.

Wire baskets from Aldi sale for most large ink pads
Ferraro Rocher boxes for small ink pads.
Undershelf baskets from The Range, about £1.50 in sale otherwise £3 at the end of last year. The document folders hold with stamping magazines and stamps stored together. The folders are really strong with good zips. I think I paid about £12 for 20-25 a couple of years ago from Amazon. Will get more as needed. Much longer lasting my usual plastic ones with a popper closure.

Extra shelf fits perfectly over Gemini giving a place for all the plates. Still available in The Range etc. £1.50 in sale. Now £3.

These pen/pencil holders arrived today. £8 each from Amazon. I quickly stuck them together for the photo. You can get 3 or 4 different size holes depending on what you want. They will be laid on their sides.
 Die storage boxes with magnetic sheets holding the dies. From Hobbycraft years ago when half price - £5 for box with 3 magnetic sheets and £3 for 3(?) magnetic sheets. The best storage I have found so far. Also an A4 hard plastic folder which holds 6 A4 magnetic sheets for the larger sets of nesting dies.

Magazine rack holding my Pink frog A4 card that I use most. I have recently started putting decent size off cuts of that card into a magazine folder that I keep in the holder so I don’t have to try and find the right card in my bits box. Define saves a lot of time. Should have done it years ago!
I love seeing everyone else’s storage as well as I find I am always moving things around when I see a better way.

Lilian 


My storage, not very tidy I’m afraid.

Mine


My StampinUp Card, in magazine storage boxes.

My (messy) ribbon storage, then the shelves below have sprays, pastes, gilding wax etc. 


My most used ink pads, I got rid of the stamp storage boxes and stacked them it looks much tidier StampinUp at top, Oxides then Distress ink at the bottom 


These baskets hold my StampinUp Dies and Embossing folders, ( I have another huge box of Embossing Folders) 

The basket on the right holds my 'Yet to be used' items, its over flowed to shelf beside it !!!


I am embarrassed to show this part, those metal drawers hold different card,  vellum, watercolour,  acetate, the one on the left has Stampin Blends alcohol pens at bottom, SU white, cream card in middle and offcuts in top.  More magazine storage on top. I put my large dies,  die collections in A4 plastic  folders and store them in these mag holders. 


My other ink pads,  all Versafines, Momento etc


These drawers hold my pens...Distress pens, other colouring pens, glimmer plates and foils, small ink pads, 2 bottom drawers have bits and bobs


This Lazy Susan is a bloody genius  it holds loads of craft tools in jars, you can spin it to find what you need.


This little thing is brilliant,  I bought it on amazon before craft shops started selling them, its so handy  it holds anything from my big TH scissors to tiny tweezers, also great for holding fine glue pot upside down. 

Finally my SU stamps that have overflowed into the hallway !! 

*****************

Phew what a long post, congratulations if you made it this far!! 🤣😂😅

Thank you all so much for contributing to todays blog post.  You have all got some great Storage ideas. Its lovely to see how everyone stores their stuff, I have only shared a fraction of my stash ! 

Enjoy your Saturday Ladies,  

Love and hugs to all,

Sandra 
xxxxxx