Saturday 22 November 2014

Black & Gold


 Good Morning Ladies,
Thank you for stopping by today.
I chose to use my favourite Californian Collection for this
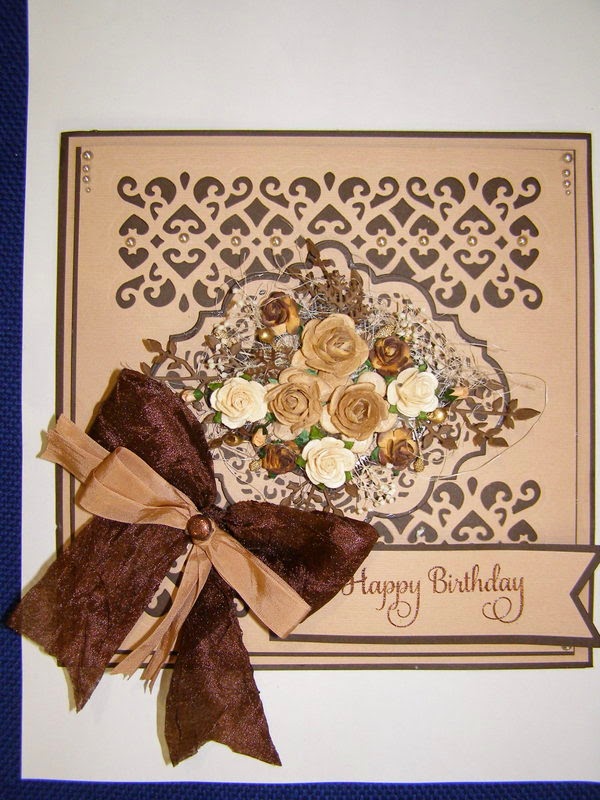
card, Creative Expressions, I also used the Italian Border and The gorgeous Delicate Daisies, designed by Sue Wilson.
I started by Embossing a piece of white card with the Heart Lattice Embossing Folder from Creative Expressions, I matted and layered with black card and a soft gold shimmer card. I then cut two Italian Borders in each colour and intertwined them down the side of the card, I used the Matting Basics A & B set of the Californian Collection and matted and layered those with both colour cards, I stamped my sentiment on black card and heat embossed with Gold Cosmic shimmer detail powder, I have to add here that these Embossing Powders are amazing, the do actually pick up the tiniest of detail, I die cut this and added as the focal point.
I tied a bow using gold silky crush ribbon, added a dazzler and stick pins, one of which I made to compliment the colours of the card! what do you think?
at the top side of the card I arranged the die cut
Delicate Daisies on top of some black Impression Obsession Leafy Branch Die cuts (just to lift them off of the base colour, so that they stood out a bit more).  I added a flat back black pearl to the centre of each of them to tie in the black.
I welcome your comments, I love reading them,
I hope you are having a relaxed weekend.
crafty Hugs,
Sandra
xxxxxx

Friday 21 November 2014

Floral Friday


 Good Friday Morning,
A small card for me today, its like a DL size card but sideways.
I covered the card base with a double sided sticky sheet, peeled the backing off and the covered
it with Cosmic Shimmer Iced Snow. I cut two of the French Border Dies from the Creative Expressions French Corner, Border and Tag die set, designer by the genius that is Our Sue Wilson,
I used some Pinflair 3D Glue Gel to stick the borders to the base, while giving a little dimension!
I cut several of the Impression Obsession Leafy Branch Die and arranged them in the middle of my card, I then added some paper roses and some tiny white flowers and some little spray bits from Anna Marie Designs.  I stamped my sentiment and cut t out using the small die from Matting Basics Die set from the Californian Collection. A picture of it boxed below.
Quite a pretty little card, perfect for a thank you or maybe get well soon card.
Thank you so much for stopping by.
 I wish you a very happy weekend, we best get started with Christmas shopping......urgh!
Crafty Hugs to all of you,
Sandra xxxx


Wednesday 19 November 2014

Wings on Wednesday!

 Good Morning My Crafty Friends,
I hope that you are all well this chilly Wednesday morning.
Todays card is made using mainly the amazing Austrian Collection Innsbruck Die by Creative Expressions, I love this die so much.
 I used a combination of cream and a dark dusky rose colour card, cutting the frame out of the cream card using the Innsbruck die and layered over the rose card,  I stamped the sentiment and embossed with clear embossing powder ( I find this easier as when you are heating it any powder that may blow off of your stamped image cannot be seen as much as if you emboss with black powder).
The Butterfly is Spellbinders 'les Papillions' and I
cut each layer from each of the card I used for the main card, I embellished it with a
string of adhesive tiny pearls and added a pearl swirl from Creative Expressions, to make a trail for the butterfly.
The flower embellishment is made using a foliage die by Impression Obsession called leafy branch, which I die cut out of green card, I topped that with some paper roses from my vast flower stash! I finished with a few more pearls in the corners.
Here is the promised picture of my stall at the Craft Fayre, obviously its my 'half' of the table, therefore a little cramped. I had a fair amount of things to sell and clearly STILL have all of those things to sell!
And by the way, yes I do ;look stressed!!
Never mind, its all behind me now!
Thanks for stopping by again today, I really do appreciate your time,
Crafty Hugs
Sandra xxx

Monday 17 November 2014

Monochrome Monday

 Good Monday Morning my lovely craft friends,
Todays card is made using the gorgeous Striplet Dies from Creative Expressions, designed by 'our Sue'!  I cut a square out of Coconut white card and die cut it with the striplet die without the cutting edge, I then put foam tape on the back and added to a mat of black card covered with double sided adhesive sheet and sprinkled with Iced snow ( I would have used Ebony Ice but didn't have any at the time)!
I used my favourite California Collection to make the focal element of the card layering plain black with black covered with Iced snow and
white card in alternating layers'
 added some flat back adhesive black pearls to the corners of the card and along the die cut parts of the card. I added another mat of white card and a silky crush ribbon bow topped with another bow made of black twine and a black pearl brad through both bows. You could probably lose the bow and the card could be masculine I think, let me know what you think.

I would love you to leave me links to your blogs so that I can pop along and support you too!
I hope that you all have a great week ahead, don't forget to stop by again on Wednesday for the next instalment, I may even post the picture that Paul took of my first ever stall at (that) craft fayre!
Crafty hugs to you all,
Sandra xxxx

Sunday 16 November 2014

Autumnal Floral Birthday

Good Sunday Morning Ladies,
I thought that  would go in a more Autumnal direction with todays card.
I have once again used the striplet dies from Creative Expressions, without the cutting edge to give us some background detail for our card, I mounted the Caramel coloured card onto a lovely warm chocolate coloured  with some foam tape for height and dimension and then mounted onto another piece of caramel card and then again onto chocolate, giving us our base, by the  way be sure to gut the lower layers of the card so as not to waste any card unnecessarily! I used the pieces that  'gutted' out to make the tag for the sentiment.
Next I cut the main focal element, firstly the chocolate layer, cut using the largest of the California Collection Matting A dies (from Creative Expressions) the next layer cut using the Caramel card and the San Francisco largest die and matted the two together with foam tape, giving us some dimension.
I used a varied selection of paper roses in matching colours from my stash and with some foliage cut from my Impression
Obsession Leafy Branch die and some of the gorgeous
range of floral sprays and natural fibres from Anna Marie Designs.
I tied a bow with chocolate coloured silky crush ribbon and
a caramel smaller bow on top and secured with a bronze
coloured brad.   I stamped my sentiment with Coffee coloured ink and heat embossed with clear powder.
Thanks for stopping by today, I hope you all have a lovely relaxed Sunday,
Crafty hugs to you all,
Sandra xxxx

Saturday 15 November 2014

Aqua French Collection Channel Card

 Good Morning Ladies,
Thank you for stopping by today.
I have used Aqua coloured card for todays card,
I used the Creative Expressions Rows Of Bows embossing folder on the Aqua card and then Die cut using the CE French Collection Border Die, designer by Sue Wilson of course,
I cut a mat for the aqua card out of Coconut white card and made it a little longer than the aqua card so that we had enough space for the channel and added a piece of Double sided adhesive sheet to the bottom of the mat (about 4 inch) wide and I peeled the backing off and covered it with Cosmic Shimmer Iced Snow. I added some foam tape to the back of the Aqua card and mounted on top of the white card and positioned the border to match but leave enough of a gap to expose the Iced Snow covered Channel. I then used the Austrian Collection Innsbruck die with white card to cut a frame to lay over
slightly smaller frame also cut using the Innsbruck die out of the Aqua card, I stamped Happy Birthday onto the white frame and covered with an adhesive sheet and added some Iced Snow to match the channel.
To finish the card  made a bow out of white ribbon added an Aqua pearl brad and stick pin that I made in matching colour beads and a tassel.  then added a few adhesive pearls to the corners of the card and along the bottom.
I hope you like todays card, you could change the sentiment and use for any occasion.
Thanks again for stopping by.
I really do appreciate you taking the time to come over to see what I have been up to, I love to read your comments, it makes me so happy.
Crafty hugs to all of you lovely ladies,
Sandra xxxx

Friday 14 November 2014

Clean and Simple Aqua Card

Good Morning Ladies,
Thanks so much for stopping by today.
Today's card is quite clean and simple by my standard.
I simply cut a piece of Coconut White card with the gorgeous Striplet Die by Creative Expressions , designed by Sue Wilson, (my craft hero)!
I used the die without it's cutting edge, once going toward the top if the card and I then left a small gap and cut again at the bottom of the card, I used foam tape on the back of this card and matted it onto a teal colour card from my stash.  I die cut some foliage using my favourite Impression obsession 'leafy branch ' die in matching teal card and arranged them with some paper roses from my stash and a few 'twiddly bits' from the flowers sprays at Anna Marie Designs. I added some seam binding ribbon in a matching colour tied into a messy bow, topped with a pearl brad. I stamped my sentiment onto white card and matted with the tael, cut into a forked pennant shape. I finished with some matching adhesive crystals in the corners.
I hope you like today's card, I would love to hear your comments, in fact I get quite excited waiting
to see if anyone stops by! ( I think I am still a little paranoid after my craft stall experience)!
Hugs to you all,
Sandra xxxxx

Thursday 13 November 2014

Fabulous Day

Hello at Last,
I have been waiting weeks for this lap top to be fixed so that I could update my blog, so here goes!..
This card is very heavily Sue Wlson influenced as are most of my cards to be honest.
 have used the California Collection for the main element of the card, some felt flowers, cut out with Sue's Classic Rose Dies, and a silky crush ribbon bow, mounted on top of the Grand vinery cut out in white card, the background is embossed with the Heart Lattice Folder by Creative Expressions. The Italian Border die is used at the bottom of the card with a pearl trim
layed over the top.
I hope you like todays card, would be perfect for a wedding or anniversary, in fact my good friend Pat S has made this card in gold and cream for her friends Golden Wedding Anniversary.
Thank you for stopping by today.
I would also like to take the time to thank each and every one of you for your kind words of support after the Craft Fayre disaster, you really did help me through at a time when I was both physically and mentally exhausted and just felt like giving up all together!  I will have a good few days of posts from the cards that I made for
the sale.
So please return over the coming days for more cards and maybe jewellery. With the weather the way it is at the moment there s no better place to be than in our craft rooms.  I need to start making some Christmas cards, I  just haven't got the Christmas mojo at the moment!
Crafty Hugs to you all,
Sandra xxx