Saturday, 17 June 2017

Mixed Up Saturday

Envelope Punch Board 


Envelope Punch Board Tutorial

Good morning ladies,

It's Saturday, so you know what that means!!!!
Yes lots of lovely crafty goodness, so to start the day I have made a quick video showing the basics of the 'Envelope Punch Board', in this video I just show you how to make an Envelope, it's so easy, I show a deep envelope too for those cards with dimension.
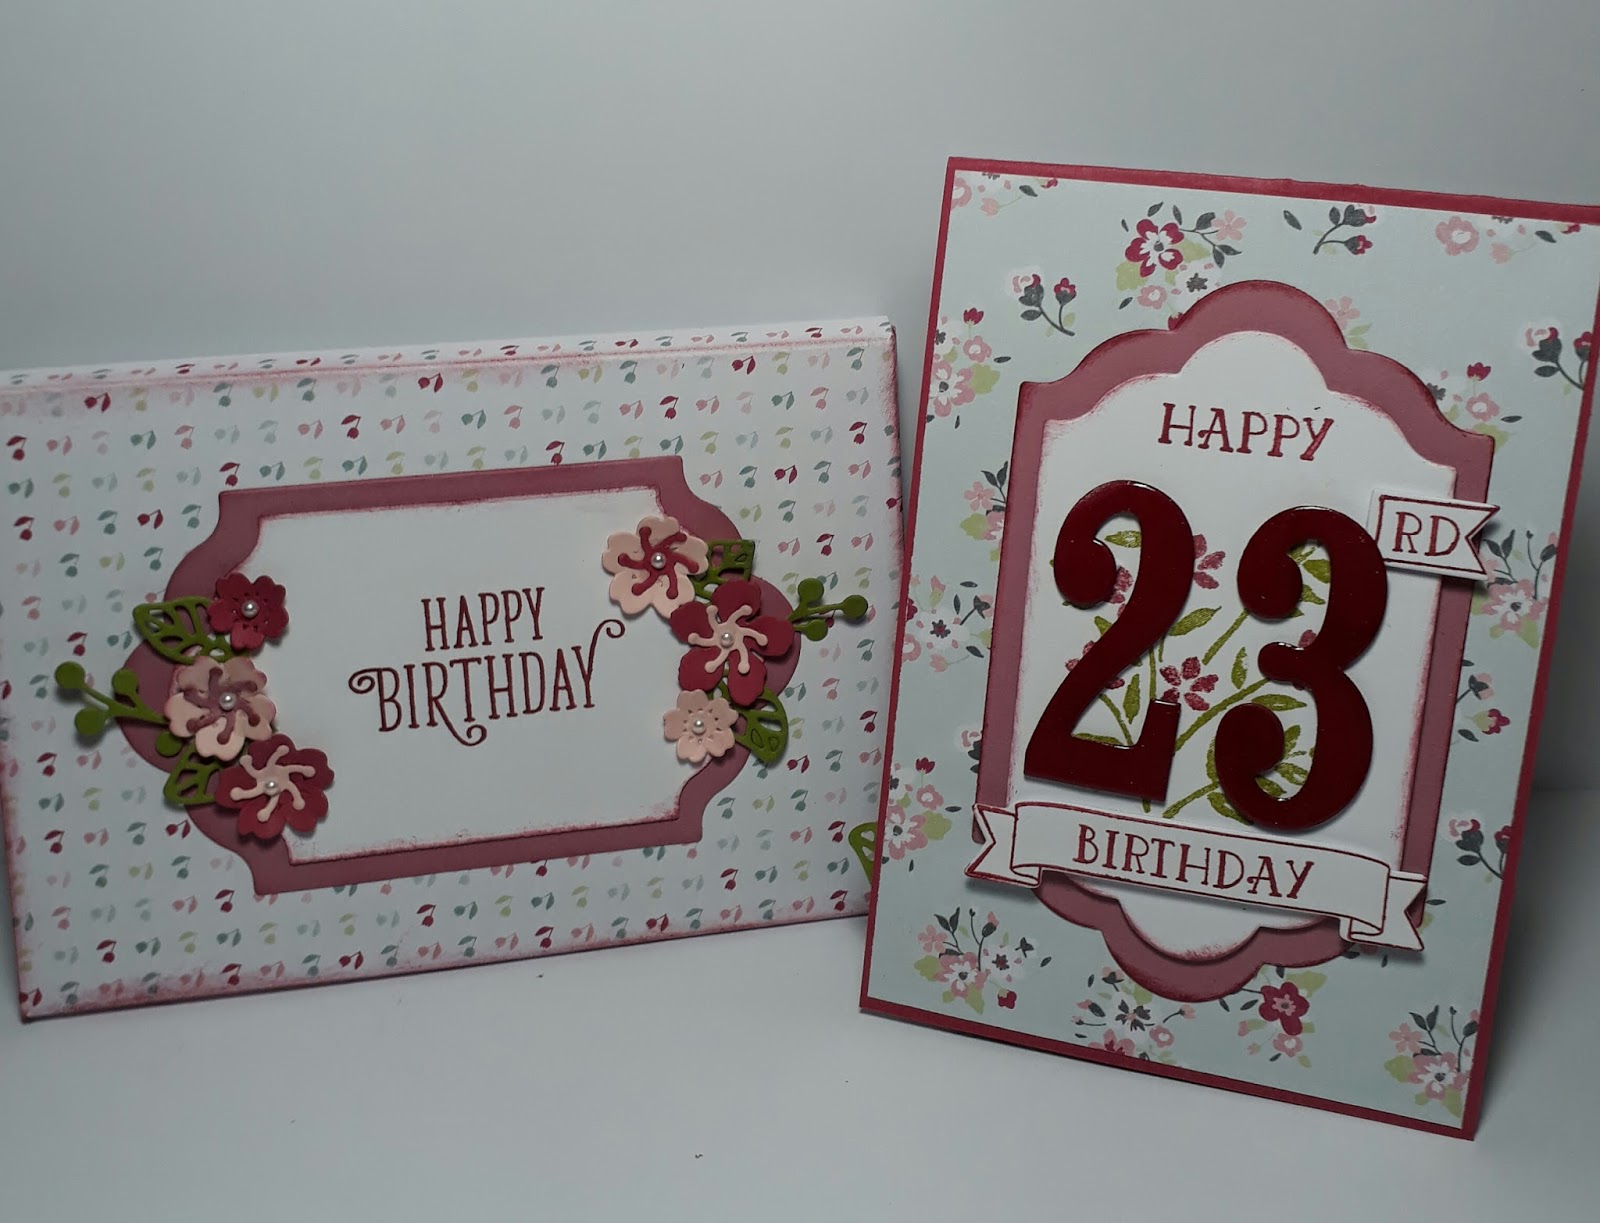
Oh and a Bonus Now, the picture above shows a few more things I made, boxes are super easy too and that's just the tip of the iceberg !!!
Now onto some crafty shopping and Father's day cards......


Tracy's Cards


Tracy has made two fantastic Father's Day cards, one for her Stepdad and one for her Father-in-law. Tracy is like me in that she has found making Father's Day Cards difficult since losing her own. You have done an amazing job Tracy, even though your heart wasn't really in it, sending you hugs and thank you for sharing xxx
Michele


Michele has made three amazing Father's Day cards, 3 totally different styles, something for every type of Dad, I love all the detail in the Stepper Card, perfect for the 'Gardening Dad's. Thank you so much for sharing Michele xxx


 Lilian's Shopping


Lilian hasn't done much craft shopping for a while, so she decided to have a bit of a 'blow out', and why not?!, I think that we could have a lot more expensive hobbies, you imagine if we were tanning and having our hair and nails done every week, that would £50 +, so I think a few little craft things isn't too much to ask.  Lilian has bought some fantastic things ......

I love that Church scene die in the first image, with that lovely border die too, I think it might be a Crafters Companion die but I'm not too sure.  There is also some colouring tools too, I'm not sure if they are 'Watercolours', I'm sure Lilian will set me straight.                                                                                                 Some lovely stamps in the second photo, Stampers Anonymous Butterflies by Tim Holtz, with matching Sizzix Dies and 3 pretty floral stamps from Hero Arts.                                                             Some lovely Stampin'Up! goodies in the third photo,   Music Background Stamp,  High Tide Stamp and 3 of the new 'In Colours, Powder Pink and Berry Burst.

Thank you so much for sharing your shopping with us Lilian, I can't wait to see the cards you make with this lot. XXX              

Another fantastic range of craft photos this week, thank you to all of those that took part.

If you have chance to watch my video and enjoy it please give it a 'thumbs Up' as it will help my channel, thank you so much xxx

I hope you all have a lovely weekend,

Love and hugs to all,

Sandra 
XxxxxxX


Friday, 16 June 2017

Wishing you brighter days!


Good Morning Ladies  

I hope that you are all well and looking forward to another weekend.  Have you all got plans? For once Paul isn't working and we have nothing on the Calendar.

We had a lovely family dinner out last night, I love it when I have all of my children sat down together, Josh  (Becca's partner of 5 years+) was with us but he is classed as family anyway, bless him. 
Today's card is another type of 'Aperture' card, i used the Stampin Up 'Weather Together stamp set and matching Die set to first of all die cut the cloud apertures in my card, I then added a light covering of 'Soft Sky' ink over the card and stamped some raindrops in versamark ink and added clear embossing powder and hear set to create the rain 'droplets '.  I stamped the umbrella and handle and die cut them both, then added then to the card, slightly coming the umbrella itself to give dimension. 
I covered it in versamark and clear embossing powder and heat set to make it look wet. 
I then stamped my sentiment and added it to my card.  I think that there ate many occasions that this would be a thoughtful sentiment.  It's just a quick card, I hope you like it. 

Val, so pleased to hear poor Kit is on the mend bless him XXX 

Karen how did your cake sale go? Xxx

Margaret  thinking of you today as you go to see eye surgeon i hope that they can get you sorted soon xxx

It's so sad seeing all of those poor people in London. We watched in disbelief as the whole block of flats was ablaze so quickly. Seeing those poor people waiting to waiting to hear news of their loved ones, that pain is hard to imagine, my heart goes out to them all xxx

Have a lovely day ladies
Sandra 
XXXXXXX


Thursday, 15 June 2017

Another Twist &Pop Card, Happy Birthday Becca


Happy Birthday Becca 

Good Morning Ladies,

I would like to start today by wishing Our Beautiful  daughter Becca a very Happy 23td Birthday, We are so very proud of the amazing young lady you have become, you'll always be my big baby though x xxx

Today's card is another 'Twist & Pop card, I used some pretty papers from a pad from the Works called 'Sweet Garden Rose, they matched beautifully with Rose Red and Sweet Sugarplum  Card from Stampin'Up!
The front of the card used stamps and dies from the Number Of years Stamp set and matching Dies, the inside of the card has the Stampin'Up! 'Happy Birthday ' Die, letters cut out using my Scan &Cut, the flowers are various SU dies, the label is from the 'Lots of Labels' Framelits set from SU.
I made the deep envelope to match the card using my NEW Envelope Punch Board , oh my goodness ladies, I am in love with this new tool it is so easy to use to make envelopes of any size, plus boxes and so much more, I can't wait to share it's many uses with you.

Pat and I had a lovely crafty day yesterday, Pat made a Twist and Pop card and started a Challenge card too. I was busy making Becca' s Birthday Card.

I hope you all have a lovely day however you are spending.

Love and Hugs to all,

Sandra
XXXXX


Wednesday, 14 June 2017

Twist and Pop Cards - Tutorial


YouTube Tutorial


Good Morning Ladies, 
I have at last managed to finish and upload the tutorial for making these fantastic 'Twist & Pop' cards,  they are so fun to receive and with this simple method they are really easy to make.  I tried several different methods, some were so complicated you almost needed a degree in maths.  I really enjoyed making this version, it makes it more exciting knowing how excited the recipient will feel when they pop in open!!

I will add the important measurements below, then leave you to watch the tutorial video to show putting the card together.

You will need 3 pieces of card to start this card .....

First piece measures 10 x 4 inches
Second piece.              10 x 3 1/2 inches
Third piece.                   8 x 3 1/2 inches 

Take the First piece (A4 x 4)

Score in half to create your front and back cover of the card.

Take the second piece


Score at 2 1/2 , 5 , 7 1)2 inches , then fold Valley, mountain, valley  this gives you 4 panels to decorate. (Part of card that 'pops' out. 

Take the Third piece (8 X3 1/2)

With short side at top of score board, score down the length of the card at 1 3/4 inch


Then make a small pencil mark at 2 1/4  & 5 3/4 inch, rotate card around and repeat on other side.  So you have 4 marks.


Take your piece of card and line 2 opposite marks up along one of the grooves on your score board (I always mark one with a Sharpie so I know I am in same groove)
Line up marks along groove and score the first part of the  'X' , rotate to line up the other two marks and score again, you should now have an X, burnish all score lines well.

This is how it should look after you have burnished your score lines.


Put your fingers by those pencil marks and gently push so that the long score line goes in like a valley fold, bringing those two triangles​ down to form an arrow shape.


Burnish the folds well and this is the hardest part finished.  Now you can follow video to see it happen in real time, it's easier to see the final fold that way too. 
I hope you find it easy enough to follow, if you have any questions please do not hesitate to ask. 

I can't wait to see your Twist and Pop cards, so please email me them to share .

Have a lovely day,

Love and Hugs 

Sandra 
XXX


Tuesday, 13 June 2017

Another aperture card and link to tutorial


Aperture Card Tutorial

Good Morning Ladies,

I have made another 'Aperture' Card for today's blog post, I have also included the link to the video I made explaining how make the simplest Aperture card, you can then decide how you want to embellish it. 
If you have time to go and watch the video please could you hit the 'thumbs Up' button as it helps my YouTube​ channel, also Subscribe so that you get notified when a new video gets added. 

I made today's aperture card by using a patterned paper, to insert the die you need to cut into the patterned paper enough to slip the die you are using to create the aperture, so if you look at the roses in left hand side of the card you can see where I get around then to fit the die in, this way the die cuts everything except the corner you have cut around.  I hope that helps you understand. 
This paper is in the new Stampin'Up​! catalogue, its the 'Petal Garden' Designer Series Paper, it's part of the same range as the Rose Stamp I made the Vellum Wrapped card with last week, I love the papers so much I bought another set yesterday.  I have used them on my Twist and pop card which I am featuring tomorrow along with a simple tutorial. 

Pat, I hope you are recovering nicely and your throat is feeling less sore xxx

Lilian I hope that you are enjoying every minute of your 5 days to yourself, hopefully your new goodies will help inspire you xxx

Janet, I hope you have arrived safe and well at Marigny, Dobie did you proud this morning! Time to relax and have some 'me' time, well once you have settled and found Jim a job to keep him busy xxx

I hope everyone has a lovely day,

Love and hugs

Sandra 
xxxxxx


Monday, 12 June 2017

Monday Challenge and a special birthday wish....


Good Monday Morning Ladies,

This weeks Challenge is to make an 'Aperture' card, it can be any size, any style, even a 'faux aperture' if you like (see below)....

Which is easily achieved by inking through a die cut circle or template in coloured ink and then stamping over the circle (or any shape you choose).

Today's sample cards: First one made using Powder Pink card and ink and Rose Garden Thinlits.  I used the smaller Rose die to cut the aperture through my card, then placed it on the inside with an extra layer of Powder Pink card for colour. 
I matched this with the matting and layering and the ribbon. I used the frame stamp and matching die to add my sentiment to the card.

The second card today and total showstopper has been made by Michele, the Strawberry Corner die was free on a magazine along with the stamp.  Michele this is one of your nicest cards.  I absolutely love it, it's so pretty, you have coloured the stamp beautifully.  Thank you so much for allowing me to share your card as a inspiration for this weeks Challenge.

I did do a quick tutorial about aperture cards just incase anyone new looking in wasn't sure how you made one, I can add it if anyone is interested.
I can't wait to see what you come up with, as always there is plenty of inspiration in Pinterest if you need it. 

Now, I have a very special birthday to share with all of you.......

Harry is 3 Today
xx Happy Birthday Harry xx


Can you believe that Lynda's Grandson Harry is 3 already?! Where have those 3 years gone?  Lynda he looks so grown up in that photo, oh my goodness I love his hair, where does he get his curls from? 
Your card that you made for Harry is so cute, it looks like a Woodware stamp, but I maybe wrong.  Beautifully coloured and personalised. 
Thank you so much for allowing us to share his special day xxx

Janet, I hope the winds didn't hamper your journey yesterday, I hope that you are well on the way by now and enjoying your new route! Take care xxx

I hope that anyone feeling under the weather a speedy recovery too XXX

Have a lovely day,

Love and hugs

Sandra 
XXXXX


Sunday, 11 June 2017

Your Sketch Challenge Cards


The Sketch

Good Sunday Morning Ladies, 

My favourite day of the week, as I get to share all of your amazing cards, so I will get straight on with it......

Lynda

Lynda has gone for Pretty floral theme this week, I have to say Lynda it looks like you have used fabric to make your card, I love the stamped floral images, you have got a lot of texture and depth by using the same pattern in different ways.  Thank you so much for taking part XXX


 Michele

Michele used free papers and images from Making Cards Magazine (Feb 2017) for this weeks Challenge card, I love the colour combination, the feathers, flags and other embellishments work perfectly Michele, you always amaze me when it comes from making cards from free magazine stuff, I chuck them all in a drawer and never use them, you really bring the best out in the freebies!  Thank you so much XXX

JANET

Janet, such a pretty card, I love that topper you have chosen, it looks like the photo was taken where you park your bike outside the café every morning, your basket is full of flowers for the tables, you really are the best cafe manager! 😉😉😘
Seriously though, you have embellished the card beautifully with those little flowers and the pretty bow  appliqué. Thank you my lovely, safe journey, enjoy every mile, XXX
 Maria

Maria, a perfect card to brighten somebody's day, i love the colours you have used and those flowers look like Hydrangeas, I used to live seeing them in my nan's garden, some pink and some purple.  Your little banner is perfect for sentiments too. 
Thank you so much for taking part XxX

Brenda

Brenda has been playing with some of her Stampin Up stash for this weeks Challenge card, she has used all StampinUp products, well not counting the card itself. The background I stamped from Avent Garden using Smoky Slate and Calypso Coral ink pads. Happy Birthday is from number of years stamp set. I also used Calypso Coral to colour the ribbon. The papers are from Little Foxy designer paper stack. Absolutely stunning card Brenda so love it XXX

 Val

Val's​ card has a stunning colour theme this week, I adore that blue card, its stunning and your topper matches perfectly too, what is that Embossing Folder that you have used, It's so nice!! The little bit of ribbon and gem stones add that little touch of Luxury, thank you so much for taking part XXX

 Margaret

Margaret has chosen the same stamp set as I used to on my Challenge card, well they do say that great minds think alike!!! 😉
I love all of the texture you have achieved by using a linen like card, the ink has enhanced all the texture, lovely colouring too.  Thank you so much for taking part XXX

 Karen

Karen, a real WOW card from you this week, your Friends and Colleagues must be so thrilled to receive such amazing personalised cards, I love this one very much.  Here is Karen's description of her card:

So, here's my CC I used Spellbinders Celebration Paper Cuts die as focal element Sue Wilson closed and open petalled daisies
Sue Wilson Pierced Flags and a couple of CE brads which happened to match the gingham and Topsy Turvey C&C cardstock
The embossing folder is SW's pinpoint checkerboard used at a 45 degree angle.
Thank you so much Karen for taking part each week.  
XXX
Lilian

Lilian has opted for a 'Man Card' this week, a lovely handmade background paper using Cogs, with a die cut cog for embellishment along with a fabulous border of what looks like washers, all very 'mechanical', which creates the perfect backdrop to the fabulous Vintage Car that has been beautifully coloured too. 
Thank you so much for taking part XXX

I think I've got everyone, shout if I missed you!

Enjoy your Sunday everyone 
Love and hugs 
Sandra
XXX